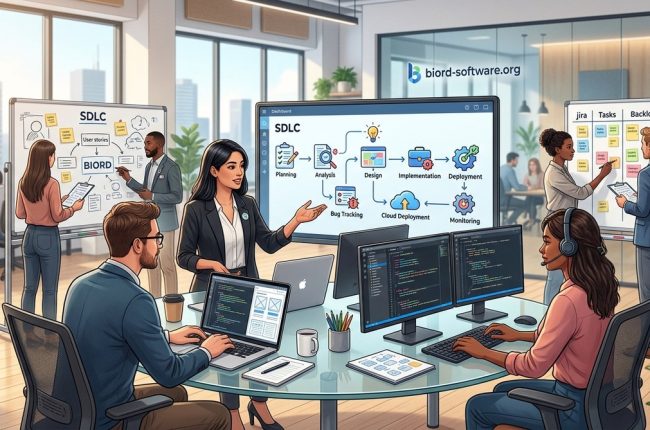
An Development Environment for Qt4

QDevelop - Documentation


This documentation is in writing.

Introduction

QDevelop is a cross-platform integrated development environment, entirely dedicated to Qt4. It consists of a Qt project manager, a source code editor, build-automation tools by calling make command, and the gdb debugger. QDevelop aims to be easy to use and does not try to compete with more complete tools, like kdevelop, which are often too complex. Its goal is simplicity, powerfulness and a same interface on all platforms.

Install and build

Download is available from http://qdevelop.org, the official website. You need Qt (from Trolltech) at least version 4.2 to be able to compile QDevelop. Most Linux distributions normally already package the latest version of Qt, so it is likely that you don't need to worry about this. However, you need the development package as well (sometimes named as qt-devel or qt4-devel, it varies depending on the distribution). The simplest way to compile QDevelop package is:

1. Extract the source zip.
2.`cd' to the directory containing the package's source code and type `qmake' (`qmake -recursive' with Qt 4.2.x) to generate the Makefile for your system.
3. Type `make' on Linux or `mingw32-make` on Windows to compile the package.
4. The executable file QDevelop (QDevelop.exe under Windows) is built on bin/ directory. Copy it where you want. It's works alone without other file.

External tools

Required tool

To build QDevelop and after to develop with it, the GNU Compiler Collection, gcc must be installed. Under Linux, simply install the development packages. Under Windows, MinGW - Minimalist GNU for Windows is needed.

Optional tools

External tools used by QDevelop are optional but are strongly recommended to have all functionalities:

Gdb

If you want to have debugging functionalities, you must install gdb. Gdb is normally installed with development packages under Linux. gdb for Windows is available here : http://www.mingw.org/download.shtml/

Ctags

Ctags generates an index (or tag) file of language objects found in source files that allows these items to be quickly and easily located by a text editor or other utility. In QDevelop, Ctags is required to have code completion and class browser. Under Linux, ctags is normally installed with development packages. Under Windows, ctags is available here : http://prdownloads.sourceforge.net/ctags/ec554w32.zip?download. Put the executable in a directory accessible by variable the PATH (the source files are not useful). On some Linux distributions, /usr/bin/ctags is a link to Emacs ctags who is not a good version. In this case, in "External Tools" dialog, set the command to /usr/bin/exuberant-ctags for the ctags field.

return to index

Launching

What QDevelop does during startup

Here's the description of what QDevelop does during session startup:
  1. Processes command line options
  2. Load the user interface translator. The language is given by the current system language or by the command line options.
  3. Control external tools :  Qt4, make, gdb, ctags.
  4. Reads the init file in your home directory and loads last project and files in editor.

Command line options

QDevelop may be launched with some parameters:
QDevelop [-l translation] [file(s)] [project]

-l translation

When QDevelop starts, it detect automatically the language of installed system. If you want to use another language, use this option.
Available languages are English, French, German and Dutch.
[file(s)] Open the files in editors.
[project] Open the (.pro) file in QDevelop. The other files are closed before open the project.

Qt projects

The contents of the project files understood by QDevelop are identical to those created by qmake and do not require a particular format. When a project is opened, no additional file is created to manage it and build the executable (except necessary Makefiles and objects files). Thus the project files can be created by QDevelop or by other applications or text editors.
Some restriction exists concerning the opening of project files. Are not managed and understood:
But these features not understood are not required to manage and build complex Qt projects.
If you want to open a project who contains information not understood, it is possible to do it. If no file is added and if the properties are not modified, the project will not be saved and will not be modified.

Open a project

A Qt project must have the (.pro) extension to be opened in QDevelop. There are several methods to open a project:
When a project is opened, all files are closed and the new project is loaded. In the "Project Explorer" are showed the following  items:


The files are added grouped by category: sources, headers etc. If the project contains sub-projects, they are added in branche "Sub-project". The variables of the project are hidden in the treeview but accessible and modifiable by the menu "Project | Propertie of ...".

Create new project

The creation of a new project is available on menu "Project | New Project". A dialog is shown to choose the name and the location of the new project.


Three templates are avalaible : Dialog based, Main window and empty project. If the user choose one of the two first choice, a (.ui) file is added in project with its subclass.
Here the diférents elements of the dialogue:
When the OK button is clicked, a (.pro) is created in directory chosen. The projects explorer contains the name of new project and its items. The properties can be changed by the menu "Project | Propertie of ..." and new files can be added on menu "Project".

Project properties

The properties of project are available by the menu "Project | Properties of ...". In this dialog, all variables and properties of project can be modified.


In advanced mode, all Qt configuration variables can be set. To obtain details on how configuring the project files, please read the qmake manual.


The tab “variables” makes it possible to modify and add variables to the project. These variables are Qt variables or can be user variables. In the figure, some variables are present. On the left the name of the variable and on the right its value. To add a new variable, click on the button “+” under the list “variables”. QDevelop presents a list containing the variables recognized by Qt with a comment explaining their uses. It is also possible to choose “User variable” to create a variable user. When a variable is created then selected in the list, it is possible to enter a value while clicking on the button “+” on the right. In the example, variable “LIBS” receives as value "-L/usr/local/lib -lmath" which makes it possible to add an external library.


Project Database

In project directory is created a database named "qdevelop-settings.db". This file is used to save many informations about current project :

With this database, the projects are reopened very quickly but Qt must be built with the SQL driver sqlite. Without this driver, the application will work but it's very advised to activate it.
To configure the Qt library for your machine type, in the package directory, run the ./configure script under Linux and configure.exe under Windows. Use the -qt-sql-sqlite parameter to build the database driver statically into your Qt library or -plugin-sql-sqlite to build the driver as a plugin.
To create the library, type: make under Unix/Linux/Mac and mingw32-make under Windows then make install or mingw32-make install to install the library.

Edit files

The files in the explorer can be opened by a double-click or a right-click on item. A file external of project can be opened by the menu "Project | Open...". When a file is opened, it is open:

Use internal editors

Internal editor have powerful features: code completion, syntax highligthing, auto-brackets, auto-indentation, auto-save before build, line numbers and selection margin. All these options can be configured in menu "Tools | Options".
When a header file (.h) or a sources file (.cpp) is opened, the internal editor shows on top a button to simply switch between files (header to sources or sources to header). To work, it is necessary that the two files are the same location and prefix. 
If the file edited is a sources (.cpp) file, two combobox are present :
  1. The list of classes for this file.
  2. The list of methods for the selected class in "classes" list.


When a item is chosen in methods list, the editor is placed on the method chosen what makes it possible to move quickly in the file.
A button "Refresh" is present. It launch the parsing of the file. It's useful to refresh the lists when a method or a class is added or deleted.

Code completion

Completion shows an instantaneous list of possible completions for the current prefix of entry and makes it possible the user to choose in the list.

Assume an application has a class Foo with some member functions:

class Foo {
public:
void Bar() {
/* ... */
}

void FooBar( char character, int repeat ) {
/* ... */
}
};

When the developer references this class in source code, e.g.:

Foo myFoo = new Foo();
myFoo.

as soon as the user types the "." or "->" after myFoo, QDevelop automatically lists all the available member functions (i.e. Bar() and FooBar()). The user can then select one by using the arrow keys or mouse. If some letters are entered, the list is placed automatically on the item starting with these letters. Completion also works with the static members. For example while entering QString::


Class browser

The class browser allows the programmer to browse, navigate, or visualize the structure of classes, members and functions of projects.


Each item is showed with an icon who represent his kind (function, member, structure etc.) and access (public, private and protected). By right-click, each item display a menu popup to open his implementation and declaration. If the implementation if available, the double-click shows it by default. The items are updated in real time (creation, modification and deletion) when the text in editor is modified and the interval between two updates can be configured in options dialog. By a right-click, it is possible to refresh the content. When the refreshment is asked, the tree browser is cleared and all files of project are parsed, what can be slow. To use the class browser, please read the ctags chapter.

Add new method to a class

By right-click on a class name, the menu "Add Method..." allow to add a new method to this class.


Add new variable to a class

By right-click on a class name, the menu "Add Variable..." allow to add a new variable to this class.


Add set and get methods to a variable member

Dialogs subclassing

The dialog files (.ui) created with Qt Designer contain XML and require to be transformed into header C++ files to be compiled with the project. For the dialogs of the project, the transformation is launched automatically with compilation. This conversion which makes the dialogs comprehensible by the compiler does not make it possible to enter the code to execute by these dialogs. An interesting functionality of QDevelop is to provide an assistance to the implementation of the dialogs. A right-click on the (.ui) file in explorer then choice "Dialog subclassing..." shows the sub-classing window. It list all the widgets present in the dialog and allow, for each to choose the signals to implement.


The sub-classing is created in two new files (.h) and (.cpp) who contain a new class inheriting of the header file generated during compilation. The new implementation contain for each lines selected, a new slot associating the name of the object and the selected signal. By default, "impl" is added to the dialog name. By example, if the name of the dialog is "dialog.ui", the implementation filename will be "dialogimpl.cpp" and the header filename will be "dialogimpl.h". For the name of the class, "Dialog" becomes by default "DialogImpl" in the new inherited class. The automatic connections feature is used for the sub-classing of dialogs. For example a button named foo selected with the clicked() signal selected will make create of the method void on_foo_clicked(). This method will be called during the execution when the button will be clicked by the user. This feature is available for the widgets and for the menu entries or the toolbar buttons.

Plugins

QDevelop features can be extend by using plugins.

Where do I install plugins?

On Linux, plugins can be installed in three locations:

  • The plugins directory in /usr/lib/qdevelop/plugins
  • A plugins directory in the QDevelop profiles directory (~/.qdevelop/plugins)
  • The user path pointed by directory defined in "User plugins directory" in options dialog. If it is defined, this directory is used in place of others. 

As a general rule, you should install plugins in /usr/lib/qdevelop/plugins directory. Installing in the profiles directory is only recommended if you can not install plugins system-wide because of permissions issues. The user path can be used by developper to test new plugins.

On Windows, plugins can be installed in two locations:

  • The plugins directory in subdirectory plugins in application directory path as C:\Program Files\QDevelop\plugins
  • The user path pointed by directory defined in "User plugins directory" in options dialog. If it is defined, this directory is used in place of others. 

Building projects

A project can be built in two modes: debug and release. These two modes can be configured in "Project | Properties of...". To use an mode or other, it is necessary to have Qt libraries built in corresponding  mode. The best is to compile them in the two modes.

Release mode

The project is built without debugging symbols. The code is lighter and the executable is faster. In QDevelop, the program is launched more quickly since gdb is not used. But no debugging is available, it is just possible to stop the program. For this mode choose release in properties dialog then, after build, launch the program by the menu "Debug | Start Program".

Debug mode

In this mode, the project is built with debugging symbols. The debugging in QDevelop is available and it is possible to put breakpoints in code (see below). But the program starts more slowly since gdb takes control. After changing the mode to debug in properties dialog and build the program, launch it by the menu "Debug | Start on debugger".

Build errors

During compilation, errors or warnings can occur. The errors lines are showed  in red, the warnings in blue. A double-click on one of these lines opens in the editor the file on the corresponding line. If the file does not open, it is a problem of localization. Indeed, GCC shows the lines with “error:” and “warning:” or their equivalent translated in your language.


QDevelop detects these lines in this way and if your language is not translated, the lines will not be detected. The solution is to open the files mainimpl.cpp and find the comment lines who contains :
// Modify the two strings below "error:" and "warning:" to adapt in your language.
Under change “error:” and “warning:” by the words produced in your language by GCC. Two places in the source are concerned.

Debugging with QDevelop

To debug a project on QDevelop, there are several prerequisites :

To stop the debugging program put breakpoints by clicking on number lines in sources files (.cpp) or press F9. Then run it by "Start On Debugger".  When the program reaches a breakpoint, the program stop and the editor shows the current executed line by a blue arrow.


From this moment it is possible to:

When the program is stopped on a breakpoint, in tab "Debug", the content of variables is showed:
The content of variables is updated each time the program is stopped. An interesting feature is the automatic showing of the contents of QString.


It should be noted that the Windows version of gdb does not stop on breakpoints placed in contructor methods. Always under Windows it is not possible to stop the debugging program by the button "Stop Program" whereas that is under Linux.

return to index